DDRUM/DSU Custom DLC Guide
Welcome to the guide on making DLC for the DDR Ultramix or DS Unleashed games. This guide is intended for those who know how to deal with the basics of editing game data and running Python scripts. If you intend to make DLC for Ultramix 1, you will also need to know how to use a hex editor.
Table of Contents
| 1. | Prerequisites and FAQ |
| 2. | Editing Song Metadata & Stepdata |
| 3. | Converting Music Files |
| 4. | Compiling |
| 5. | Testing |
| 6. | Troubleshooting |
| 7. | Example Data |
For the rest of this guide, the games will be called by their Ultramix titles. The information presented here is presumed to work with Unleashed.
Prerequisites and FAQ
You will need the following items:
| 1. | Original Xbox or emulator with FTP |
| 2. | Any DDRUM/DSU game (Excluding DDRUM4) |
| 3. | Base DLC package |
| 4. | Official Xbox XDK + VS.NET 2003 + Windows XP VM |
| 5. | Notepad |
| 6. | Hex editor (UM1 only) |
| 7. | Audacity |
Q: Do I need to make seperate DLC packages for Europe/US players?
A: If you are making DLC for Ultramix/Unleashed 2 or 3, no. Both of those games share the same title ID across regions and do not need any changes in the packages to be detected. If you are making DLC for Ultramix/Unleashed 1, yes. They use a different title ID.
Q: Why can't I use DDRUM4?
A: For whatever reason, Konami decided it would be best to have all DLC from all the previous games on disc. This means that your copy has all the DLC for the previous mixes, even if you don't have said DLC installed, it's just merely locked out unless you have the DLC installed. As Konami already decided on what their DLC packs would contain before release, they decided to also contain the UM4 DLC on disc. That means whenever you launch custom DLC on UM4, the game will freeze.
Editing Song Metadata
Create a folder on your computer dedicated as a workspace for the project. It will get pretty messy.

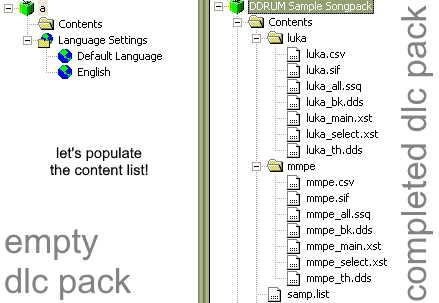
For starters, here is what the base DLC pack looks like. You have a folder named "base", this is where the data for one song goes. There is also the sbpk.list file, this is the pack's master list containing all songs. We'll discuss more about this in a minute.
Inside the base folder, you will see 7 more files. The base.csv file is used for directing movie backgrounds, which is covered in the movie direction guide. The base.sif file is our metadata, very important. Note that depending on the game you are working with (UM1 or UM2/3), you may need to use a hex editor to edit the data. The guide will touch upon this later.
The base_all.ssq stores the song's chart data. This file format is used by a lot of DDR games. Next is base_bk.dds, this is the background displayed when you are playing the song. Following that, the base_th.dds is the song's banner. Finally, the base_main.xst is the sound data for the song when it's being played. Similarly, the base_select.xst is the sound data for the song preview. Now you know!
The first thing we want to do is give our new song a unique ID. If we keep it as base, we might have conflicts with other packs or songs in the game, which will cause major issues. For example, if we install a pack with an ID that conficts with another pack, then one of the packs will not load completely. To change the ID, we first need to open the SIF file in an editor. The process is different for UM1 or UM2 & UM3.
Ultramix 1
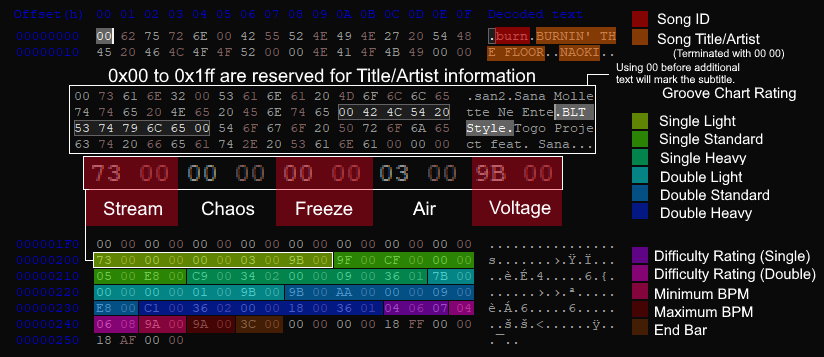
Only in the first Xbox game, SIF files cannot be edited in a text editor. It is required that you use a hex editor such as HxD to change values. Value 0x01 to 0x04 is dedicated to the song ID, edit that value to another four character ID to change the song ID.
Refer to this image on what part of the SIF files are dedicated to what value.
Ultramix 2-3
As of Ultramix 2, the SIF file format has been overhauled to become readable. Despite this, the old Ultramix 1 SIF file format will still work. Nevertheless, it's way better to edit the new SIF data. To edit the song ID, look at the 4th line. The dir variable is what the song's unique ID is. It is set to base. Change it to any other ID you want, BUT it MUST be four characters. Any less or any more and you will hit a corrupted pack error.
At this point, you are able to edit the other song metadata. Please note that the metadata file uses ANSI encoding, you cannot use some characters.
| version | Probably a hidden identifier. Keep it at 0. |
| dir | Song's unique ID. |
| title | Song title that will be displayed. |
| mix | Song's subtitle that will be displayed. |
| artist | Song's artist that will be displayed. |
| extra | No clue. |
| groove_chart.style.difficulty | Value data for the groove chart on display per style and difficulty. |
| foot.single | Difficulty numbers for LIGHT, STANDARD, HEAVY on single play. |
| foot.double | Difficulty numbers for LIGHT, STANDARD, HEAVY on double play. |
| bpm_min | Minimum display BPM. This does not affect BPM in game. |
| bpm_max | Maximum display BPM. This does not affect BPM in game. |
| end_bar | What measure does the song end? I haven't seen this be used. |
| hasVideoClip | Removes on-screen dancers. I've only seen this be used on songs on disc. |
Fill out your metadata accordingly.
If you changed your song ID, you MUST change everything related to it. For example, if you renamed your song ID from base to luka, you need to rename the base folder to luka. Here's a list of the renamed things in the new luka folder should look like.
| Old Name | New Name |
| base.csv | luka.csv |
| base.sif | luka.sif |
| base_all.ssq | luka_all.ssq |
| base_bk.dds | luka_bk.dds |
| base_th.dds | luka_th.dds |
| base_main.xst | luka_main.xst |
| base_select.xst | luka_select.xst |
Any mistakes will lead to a corrupted pack error.
Next, open up the list file in a text editor. This lists all your songs in the pack. Replace base with your new song ID. If you are adding more songs to this list, simply append it to a new line.
Congrats with finishing your metadata.
Converting Song and Step Data
For this, you will need an SSQ file. If you have one, you can skip the next few paragraphs. If you don't, you can use a SM to SSQ converter. For that, you will need Python installed.
 | Make sure your stepchart's offset is zero. If it's not, it will be offsync in game. Adjust your music and chart accordingly. |
Also, your stepchart must have a LIGHT, STANDARD, and HEAVY stepchart for both SP and DP. A beginner or challenge/oni chart is not required. If you do not have one of these charts, the game will softlock when loading that specific chart. The game will also crash if you were to hover over the song in Edit mode.
Download this Python script and put it in the same folder as your SM file. This tool will convert your SM file to a SSQ file that Ultramix can use.
To use the script, type the following with the filenames you want.
ddrcharttool.py -i (your SM filename).sm -if sm -o (song's unique id)_all.ssq -of ssq
If all goes well, you will now have a SSQ file in the directory. Drag and drop it into your song's folder in your DLC package. Remove the old SSQ file in that song folder. That concludes converting that, next we will deal with making your actual sound.
There are two XST files that we want to deal with. There's _select.xst and _main.xst! The _select.xst file is the file that will be played when the song is highlighted in the music select screen. The _main.xst file is the file that will be played when you are actually playing the song. For this part, we will need the actual song and a song preview. Make sure your song preview is only around 15 seconds, as we are dealing with a file format that is notorious for being large. Once you have your audio files, let's get started.
The best way to do this is using this really bad Python script I made to automate this process. This calls SOX to convert your music files to the appropriate WAV type, then converts them into Xbox ADPCM wav files, then finally removes the header information to become a XST file. It gets the job done, I think. Simply drag and drop your file to AutomateXST.py.
If you want a manual method, you need to convert your WAV file to a 16-bit 44098hz WAV file and then save it as a Xbox ADPCM WAV file. Once you have that Xbox ADPCM file, remove the first 44 bytes and you're good to go.
Banner and Background Data
Next is the banner and background data. You will need a program that can edit DDS images. These are the easiest things to edit, so go have some fun.
| In Ultramix 1, all images are TGA files. Ultramix 2 and 3 both use DDS (BC1 Linear, DXT1) instead. They are not interchangeable and the game will say the pack is corrupted if the proper format is not used. |
The _bk file is your background image when you are playing the song. The dummy data I have in the base has the used area filled out in red with a message on it. Simply just put whatever on the red part. The black part will not be displayed.
The _th file is your banner image when going through the songlist. The dummy data I have in the base is similar to the background image. As usual, just fill in the red part and the black part isn't displayed.
Ultramix 1 Specific
The final texture required by Ultramix 1 is _tb.tga. This is how the song will be displayed on the song wheel as information is not rendered on the fly like the other games. Write down your song title, subtitle, and artist information here. I don't know what specific font settings are used for the default textures, so you'll have to make up something.
Compiling
Once you are done, you will need to do the final part, make your DLC package ready for shipment. This is where the Xbox XDK comes in.
Install the Visual Studio .NET 2003 (which is required by the XDK installer) and install the Xbox XDK. I have used version 5849, which has XLast, the tool we need.

Once you are done with installing the IDE and XDK, open your start menu, go to All Programs, Microsoft Xbox SDK, Authoring and Submission, and open Xbox Live Authoring Submission Tool. This is XLast, the program that deals with multiple Xbox Live services including DLC packages. We will use this to make the DLC metadata so the game can recognize all of our files.
Start a new project by clicking the white page on the top left corner. You will get a window asking to select a project type, click Content Package and click OK. You will start the Content Package Wizard.
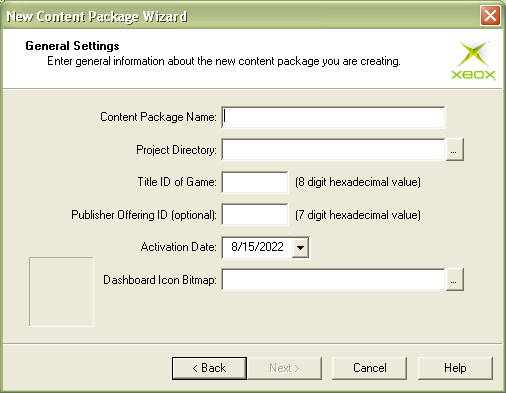
Click next and you'll see this screen. This is where you put information of your package. Put what you want your package to be called in the 'Content Package Name' field. Project Directory is the folder where your project will be saved, this is seperate from your workspace, this is where all the project files will be saved and metadata will be dropped.
The 'Title ID of Game' field is where you need to put the ID of the game the DLC is for. A table for IDs are below, use the one you intend to make the package for.
| DDRUM1 | 4b4e0019 |
| DSU1 | 4b4e001d |
| DDRUM2/DSU2 | 4b4e0021 |
| DDRUM3/DSU3 | 4b4e0029 |
The Publisher Offering ID is the unique ID of the DLC package itself. You can use any random 7 digit hex value, but make sure it doesn't overlap with the official packs. The IDs used for official packs are listed below.
| DDRUM1/DSU1 | DDRUM2/DSU2 | DDRUM3/DSU3 | |||
| Song Pack 1 | 0000001 | Song Pack 7 | 0000007 | Song Pack 13 | 000000d |
| Song Pack 2 | 0000003 | Song Pack 8 | 0000008 | Song Pack 14 | 000000e |
| Song Pack 3 | 0000004 | Song Pack 9 | 0000009 | Song Pack 15 | 000000f |
| Song Pack 4 | 0000005 | Song Pack 10 | 000000a | Song Pack 25 | 0000019 |
| Song Pack 5 | 0000006 | Song Pack 11 | 000000b | Song Pack 26 | 000001a |
| Song Pack 6 | 0000007 | Song Pack 12 | 000000c | ||
| Dancer Pack | 000001b | ||||
Activation Date does not matter. The Dashboard Icon Bitmap is a 64x64 BMP file that will be used as the DLC's icon on the Xbox Dashboard's memory screen. Make it look pretty!

The next screen will ask if the package if compatible with every version of the Title ID. Put yes.
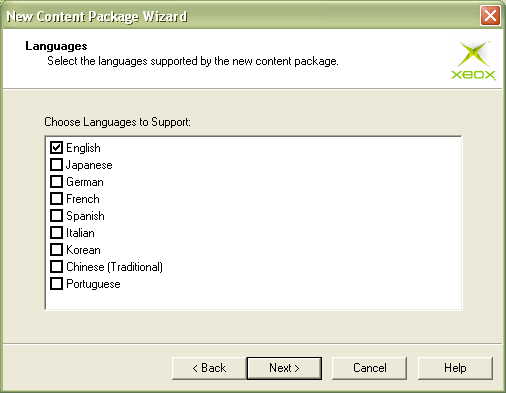
The next screen will ask what languages you support. This is only used for the Xbox Dashboard. In the Xbox Dashboard, it will display the localized name for the language your Xbox is set to. If your Xbox is set to Spanish, it'll try to display the Spanish name if avaliable. If it is not avaliable, the Xbox will instead display the default name we will soon specify. Check out which languages you want to fill out and put next.
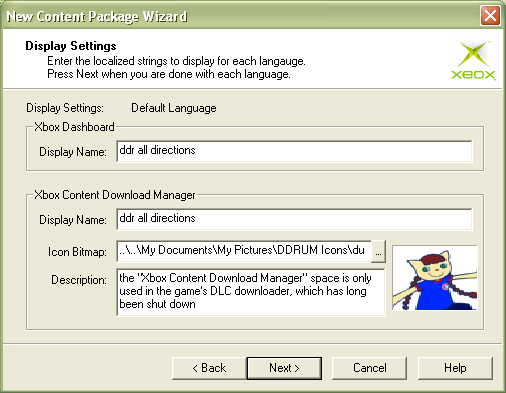
The next few screens will ask for your Xbox Dashboard Display Name. This is what the DLC will be called in the Xbox Dashboard's memory screen. Below that is the Xbox Content Download Manager, this part is only for Xbox Live's content downloader, so it hasn't been used since Xbox Live's discontinuation. Insert the name of the Display Name, a special photo to be displayed, and the description for your DLC. You'll fill this out for a default configuration and again for every language you checked in the previous screen.
Congrats! You're done with inital setup. Now the final part, adding your files.
On the left side, right click on Contents and click on Add File... Go to your DLC folder and add your .list file. Next, we will add your song data.
Right click on Contents and click on New Folder and name it the name of your song's folder. Right click that new folder and click on Add File. You will add all 7 of your files into this folder. You can highlight all of them and add them all at once. Do this for every song you have in your pack.
After this, you are almost there. On the top left, there is an icon with two green arrows pointing to a CD. Click this button. This will compile your DLC for offline installation. If everything goes well, your files will be dropped in your Project Directory in the Offline folder. This has your ContentMeta.xbx and ContentIcon.xbx file. Copy these to your DLC package.
Testing
At this point, your entire DLC package should be in a folder that's named in the proper name layout. This layout is Title ID + 0 + Unique DLC ID. If my DLC is for DDRUM2 (4b4e0021) and has an ID of 00002F1, then the folder would be 4b4e0019 + 0 + 00002F1 which is 4b4e0021000002f1. This is how Xbox DLC folder names are formatted.
| If you are using XEMU, read up on the documentation to enable FTP. Alternatively, you can also create a custom CDX installer, which requires a bit of configuration which is not documented here. |
To put the DLC on an Xbox, we will FTP the DLC to our Xbox's DLC folder. Drop the DLC folder into E:\TDATA\{Title ID}\$c\ and start DDR Ultramix. If the DLC works, you will drop into the main menu after the title screen. If the DLC has an issue, you will see a corrupted DLC pack error.
Troubleshooting
If you have issues with your DLC pack, refer to the table below.
"Content pack is damaged."
- Check if you have all the files required by the game.
- Check if your master list file mentions songs that do not exist within your DLC folder.
- Check if all of your DLC files are added into XLast.
- If you modified your data since last time you generated a ContentMeta file, you will have to regenerate it again.
- If you're trying to use a custom song pack with a DLC ID that matches one of the official packs on a later game (eg. Custom DLC for DDRUM1 with the ID 01 and loading it in DDRUM2), the game will automatically recognize it as corrupted. Please make a pack for the game you're playing.
Game freezes on the following screens.
 | 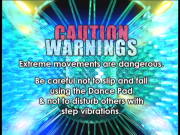 | 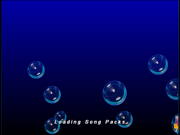 |
| UM1 | UM2 | UM3 |
- The game is loading song packs on this screen. If it says stuck for longer than a minute, you have too many songs installed. Remove some from your pack or Xbox.
Game doesn't load entire pack.
- Is the song's unique ID inside the master list? It'll completely ignore the song if it isn't.
- One of your song's unique ID may overlap with another song or pack. If the ID overlaps, the game will not load past that song on the master list.
- If no songs appear, the DLC may not be signed to your Xbox. You might need to build a CDX installer instead of FTPing the data to your Xbox.
Song data is static.
- If you are using the Python script, it may have screwed up when stripping the WAV header.
- With the converted Xbox ADPCM file, remove all bytes up until after the final 'a' in 'data'.
Game loads into menu but no custom songs are loaded.
- Your DLC may not be signed. You can use a DLC signing tool or create a custom CDX installer.
- If you are making a pack for 3, your list file MUST start with SP (ex. SP3.list) or the game will ignore the pack.
Game softlocks or crashes when loading song.
- The game cannot access the proper chart within the chart file. You must have a LIGHT, STANDARD, and HEAVY chart for both single and double play. A BEGINNER chart is generated from LIGHT charts and ONI charts are not required at all (and are impossible to access on games other than DDRUM3.)
Thank you for reading.